チャートに取引履歴を表示するには?


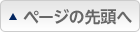
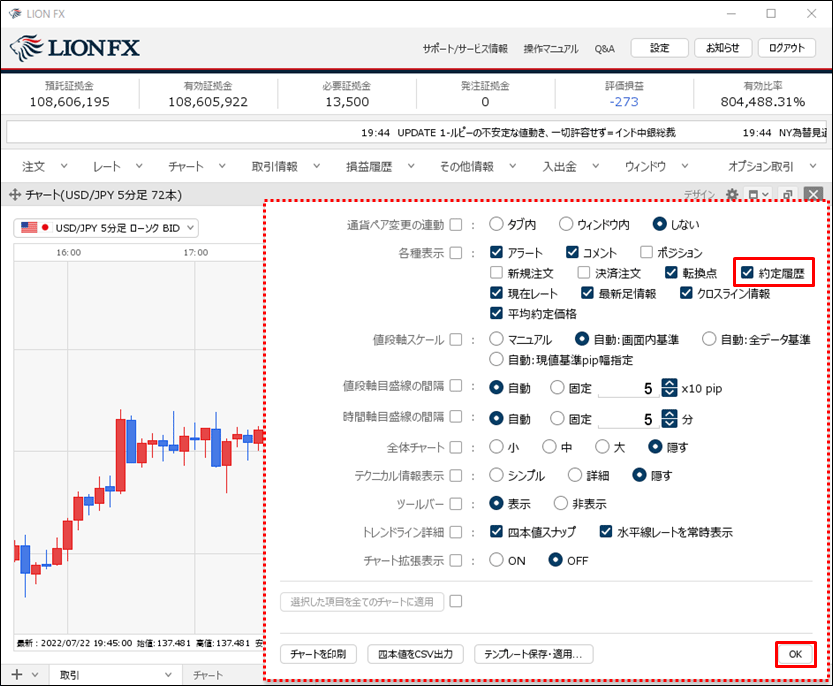
1.チャート画面の右上にある、 クリックすると設定画面が表示されます。
クリックすると設定画面が表示されます。

2.【各種表示】の「約定履歴」にチェックマークを入れ、【OK】ボタンをクリックします。
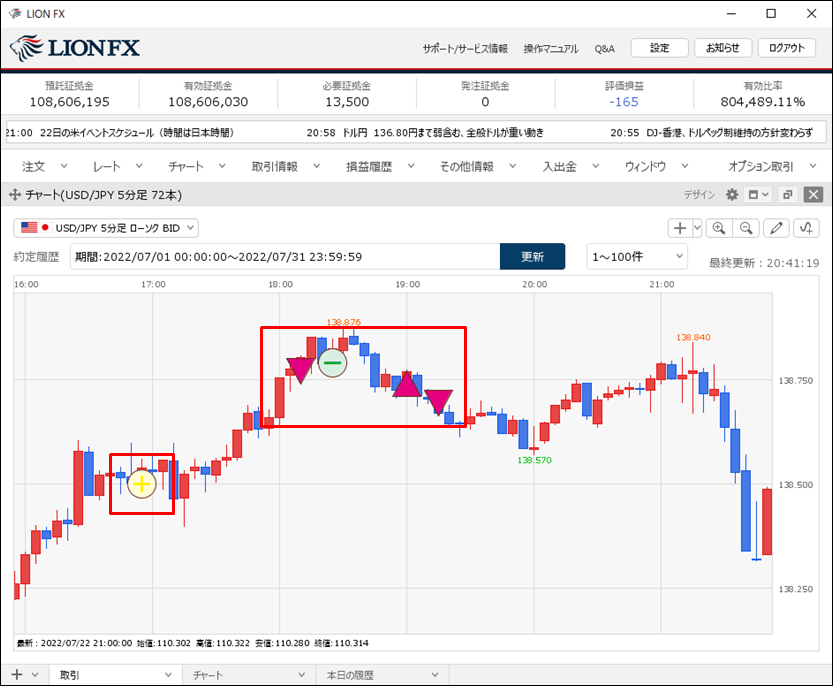
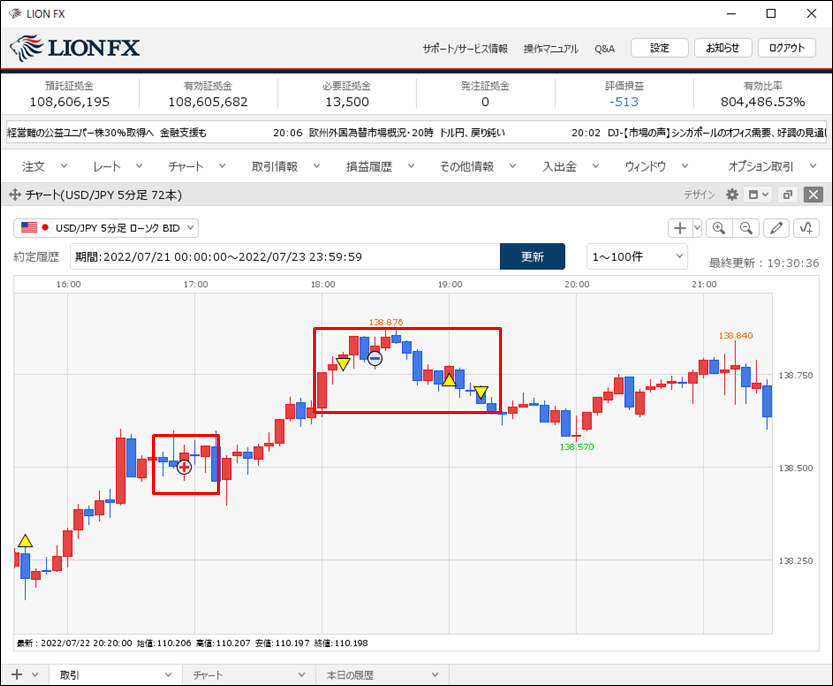
3.取引履歴が表示されました。
 ・・・買の新規約定
  ・・・利益が出た場合の決済約定
 ・・・売の新規約定
  ・・・損失が出た場合の決済約定
・・・買の新規約定 ・・・利益が出た場合の決済約定・・・売の新規約定 ・・・損失が出た場合の決済約定
4.マークにカーソルを合わせると、関連するマークが拡大表示されます。
※カーソルを合わせた履歴の簡単な内容も表示されます。
※カーソルを合わせた履歴の簡単な内容も表示されます。
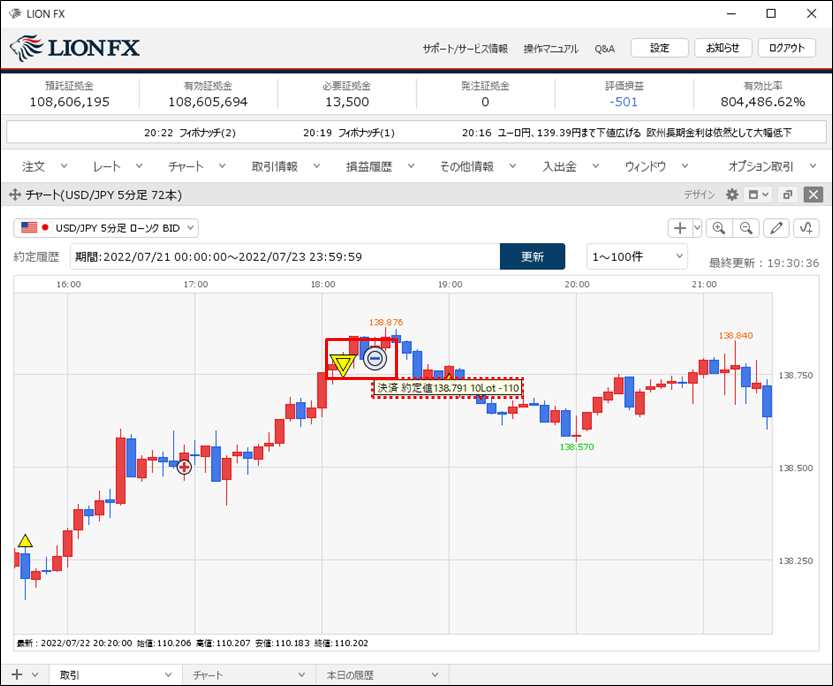
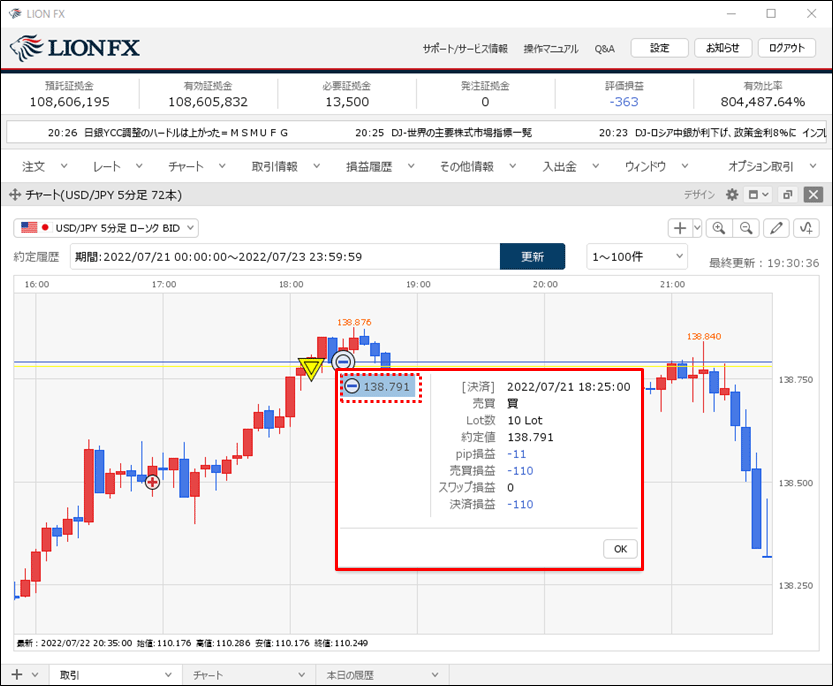
5.マークをクリックすると、詳細が表示されます。
※同じローソク足に複数のマークが表示されている場合は、左側のマークをクリックすることで詳細を切替えることができます。
※同じローソク足に複数のマークが表示されている場合は、左側のマークをクリックすることで詳細を切替えることができます。
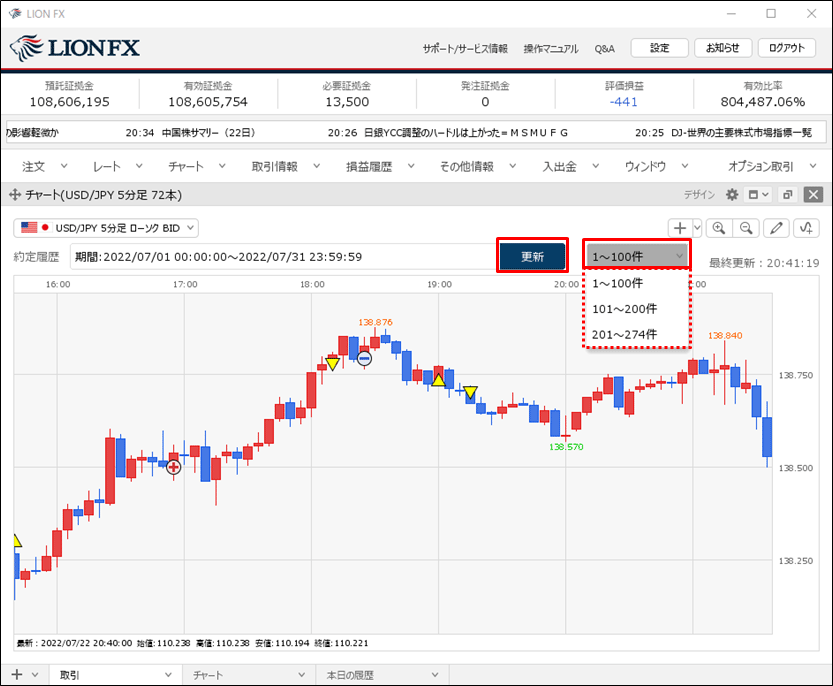
6. 表示する約定履歴の条件を絞り込むことができます。
期間をクリックすると、「期間From」、「期間To」、「更新区分」、「約定区分」、「売買区分」の設定ができます。
設定後、【OK】ボタンをクリックします。
期間をクリックすると、「期間From」、「期間To」、「更新区分」、「約定区分」、「売買区分」の設定ができます。
設定後、【OK】ボタンをクリックします。

7.絞り込みした条件で最新の状態にする場合は、 【更新】ボタンをクリックします。
約定履歴の表示可能件数は最大100件です。
絞り込みした履歴が100件を超える場合は、「1~100件」を選択し、100件ごとに表示を切りかえます。
約定履歴の表示可能件数は最大100件です。
絞り込みした履歴が100件を超える場合は、「1~100件」を選択し、100件ごとに表示を切りかえます。
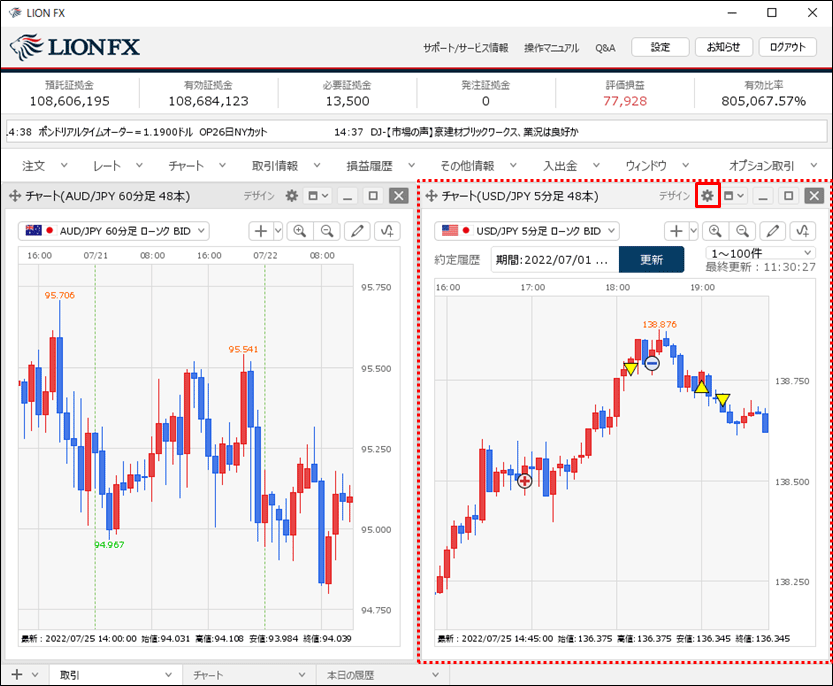
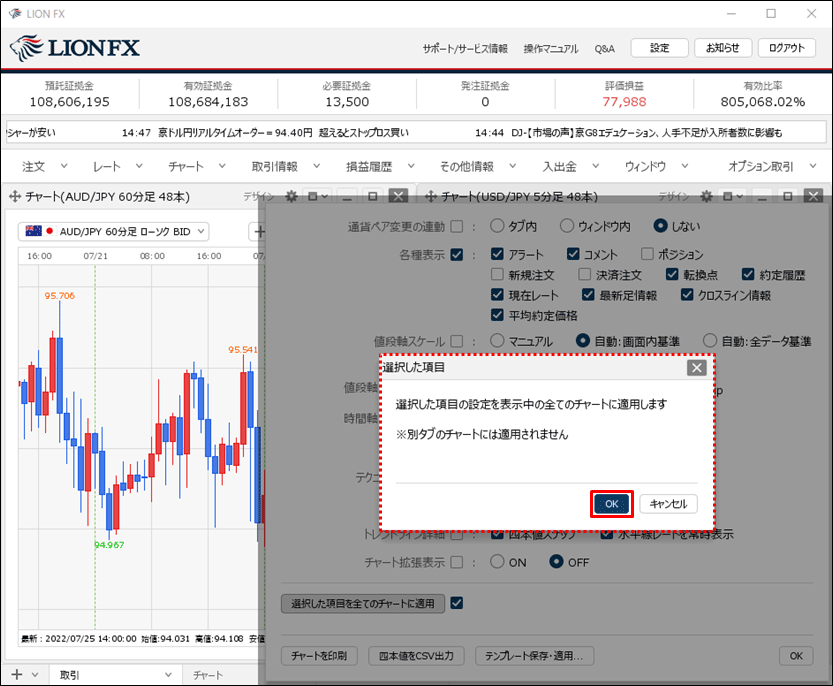
8. 複数のチャートを表示している場合、全てのチャートに設定を適用することもできます。
約定履歴を表示したチャートの右上にある、をクリックします。
約定履歴を表示したチャートの右上にある、
をクリックします。
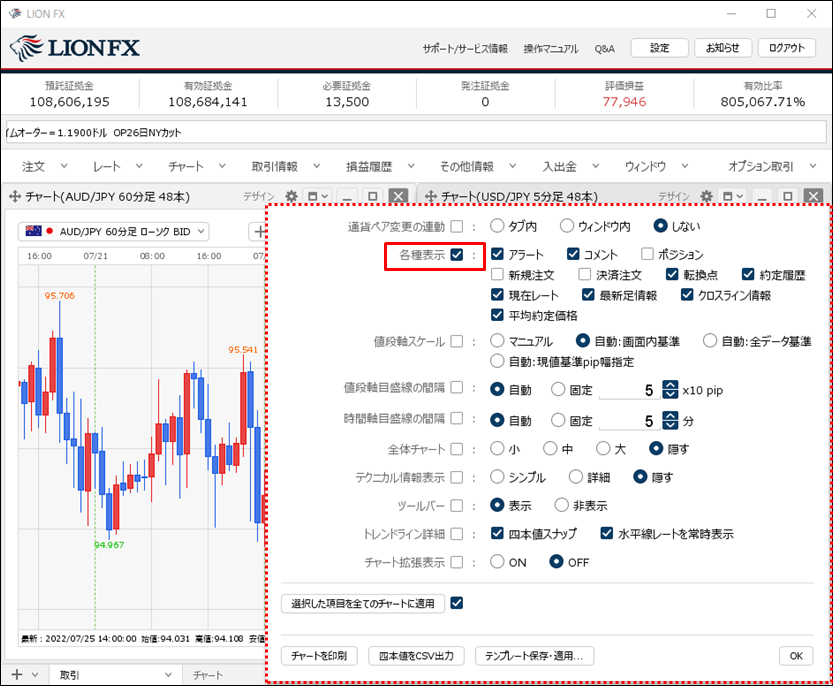
9. 設定画面が表示されたら、表示中のチャート全てに適用したい項目にチェックを入れます。
ここでは、「各種表示」にチェックを入れます。
ここでは、「各種表示」にチェックを入れます。
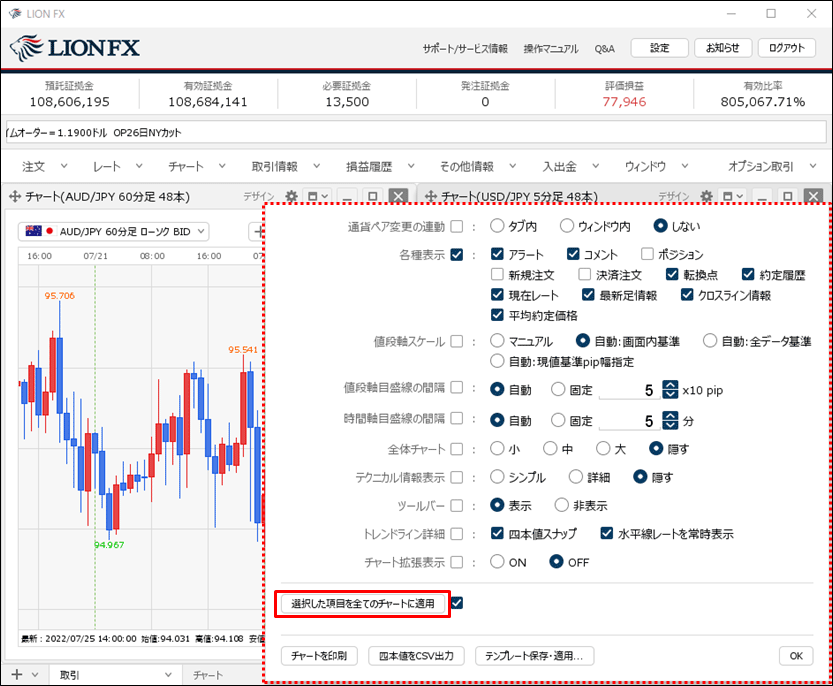
10. 【選択した項目を全てのチャートに適用】ボタンをクリックします。
11. 確認画面が表示されますので、【OK】ボタンをクリックします。
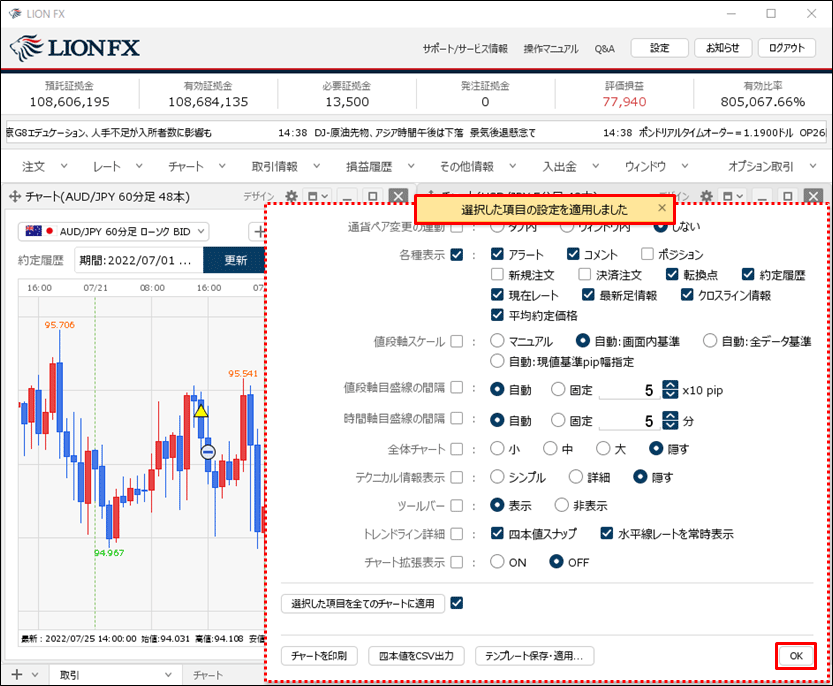
12. 「選択した項目の設定を適用しました」とメッセージが表示されたら、【OK】ボタンをクリックして設定画面を閉じます。
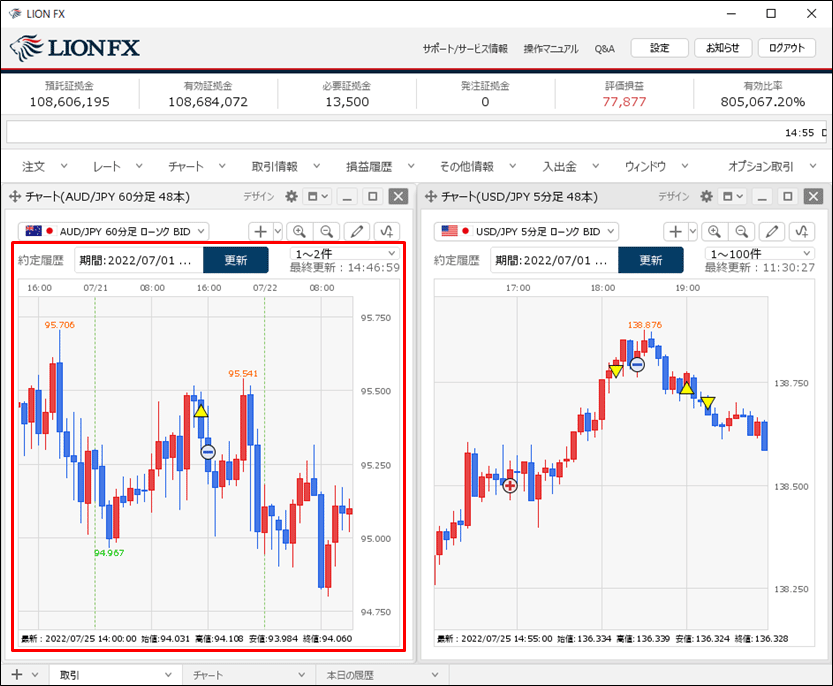
13. 全てのチャートに、約定履歴が表示されました。
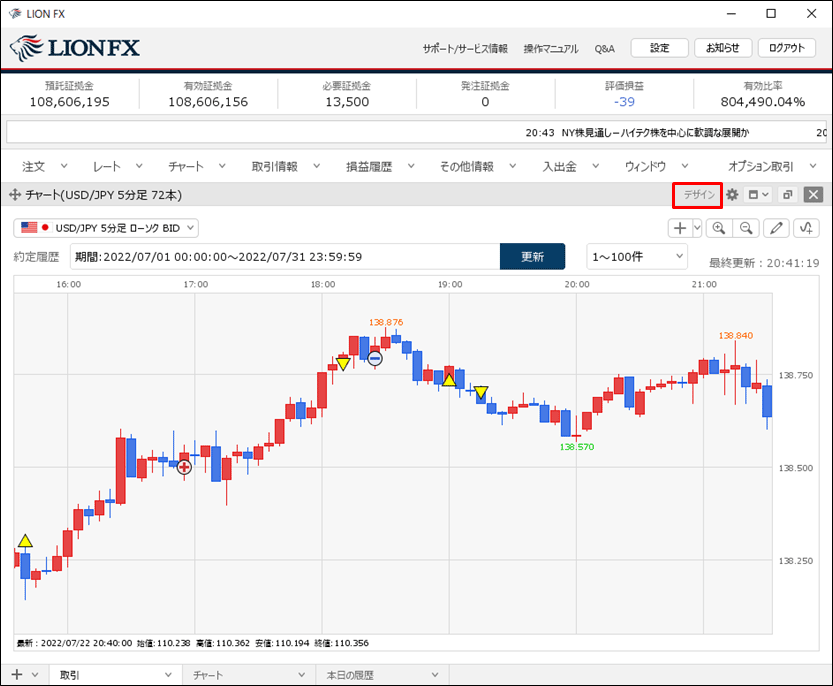
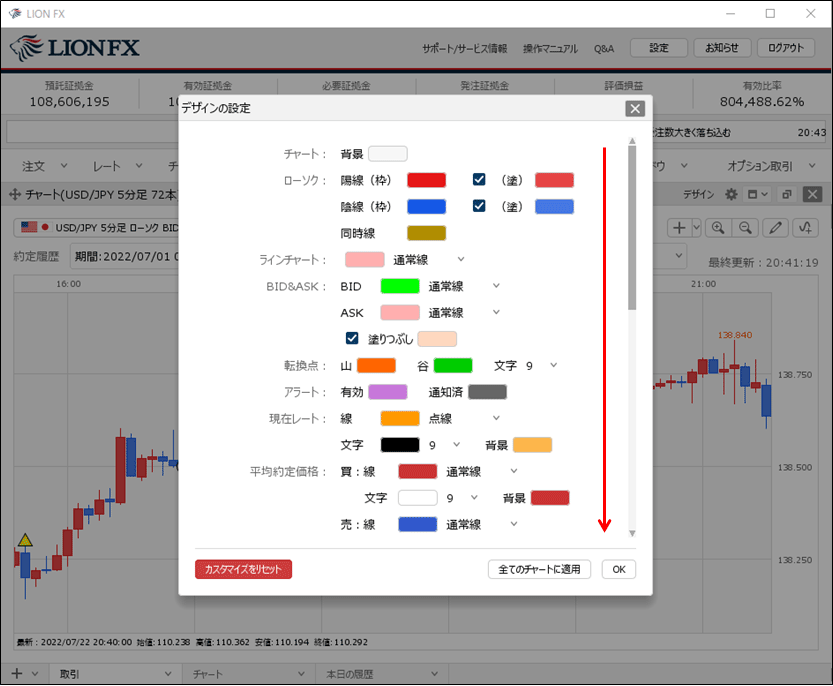
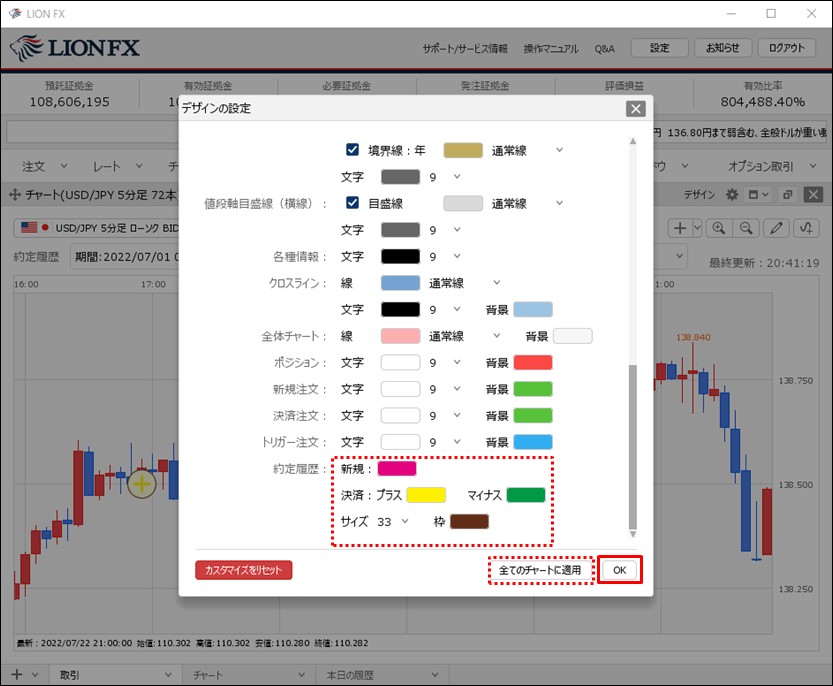
14. 約定履歴のマークの色を変更する場合は、チャート画面の右上にある【デザイン】をクリックします。
15. 【デザインの設定】画面が表示されますので、画面を下にスクロールします。
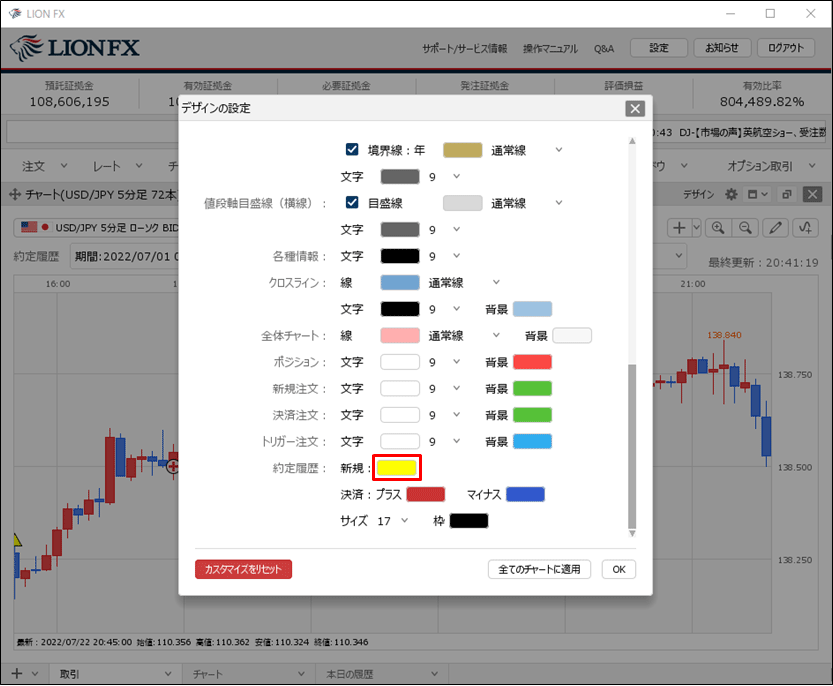
16. 新規約定履歴のマークの色を変更したい場合は、【約定履歴】の「新規」の右側にある色をクリックします。
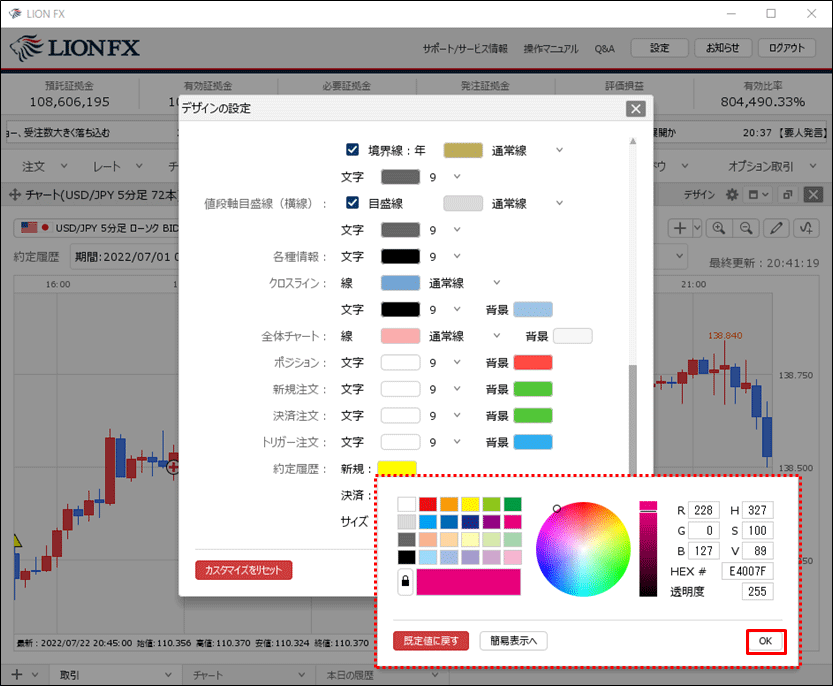
17. 色設定の画面が表示されますので、変更したい色をクリックします。
よろしければ【OK】ボタンをクリックします。
よろしければ【OK】ボタンをクリックします。
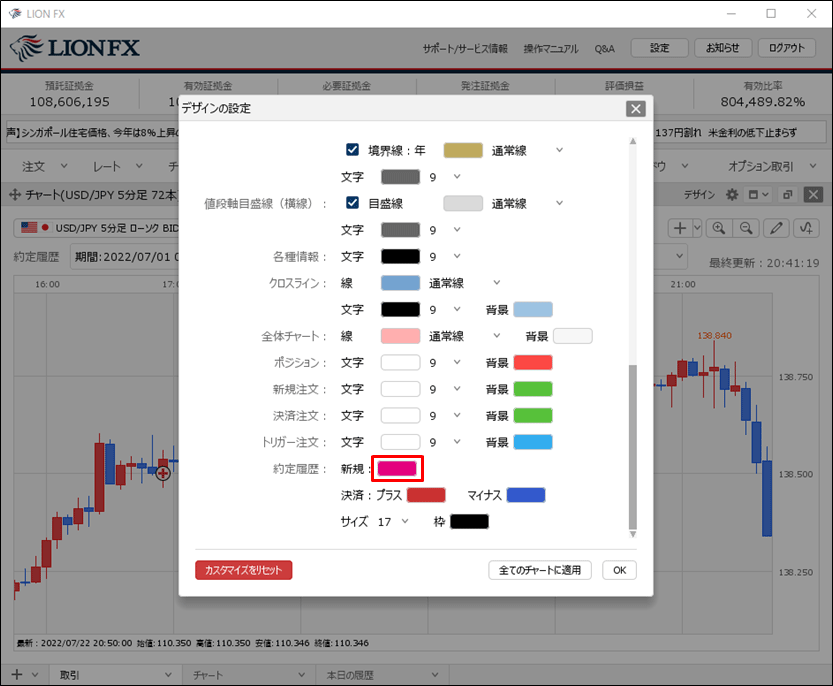
18. 「新規」の色が変更されました。
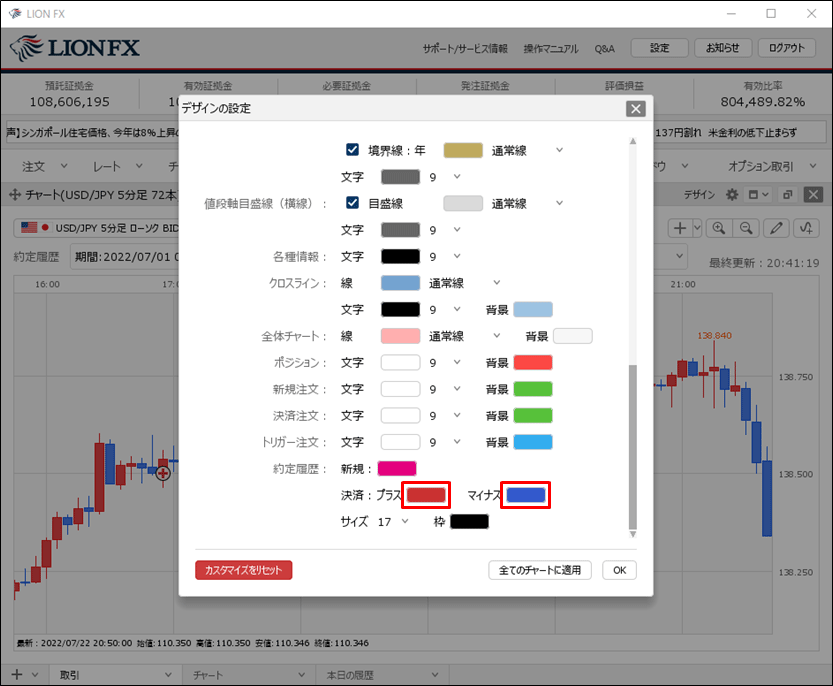
19. 決済約定履歴のマークの色を変更したい場合は、「決済」のプラス・マイナスの右側にある色をそれぞれクリックして色を変更します。
※プラス…利益が出た決済約定履歴マークの色の設定
※マイナス…損失が出た決済約定履歴マークの色の設定
※プラス…利益が出た決済約定履歴マークの色の設定
※マイナス…損失が出た決済約定履歴マークの色の設定
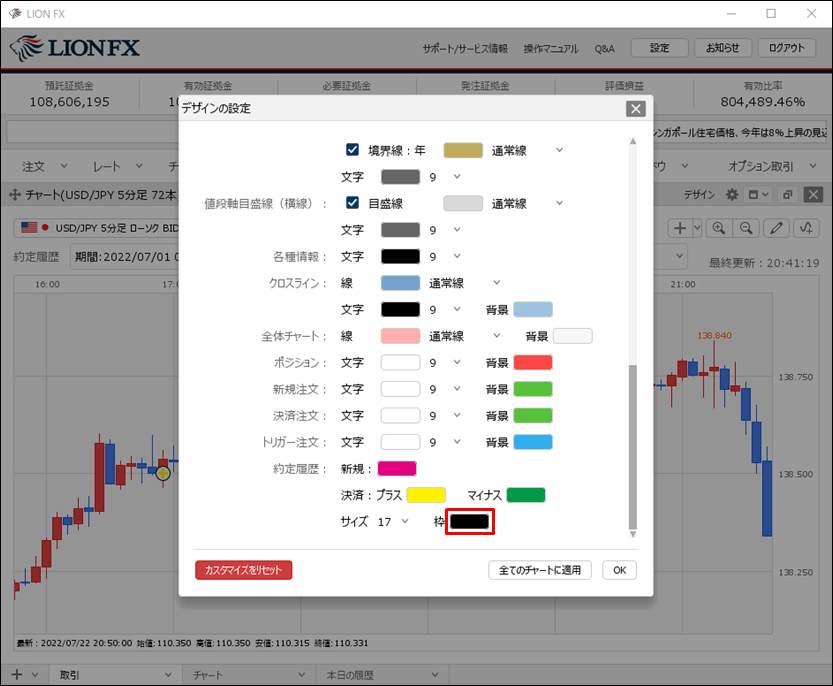
20. 約定履歴マークの枠の色も、「枠」の右側にある色をクリックして変更することができます。
※「枠」の色は新規約定履歴のマーク・決済約定履歴のマークで共通の設定です。
※「枠」の色は新規約定履歴のマーク・決済約定履歴のマークで共通の設定です。
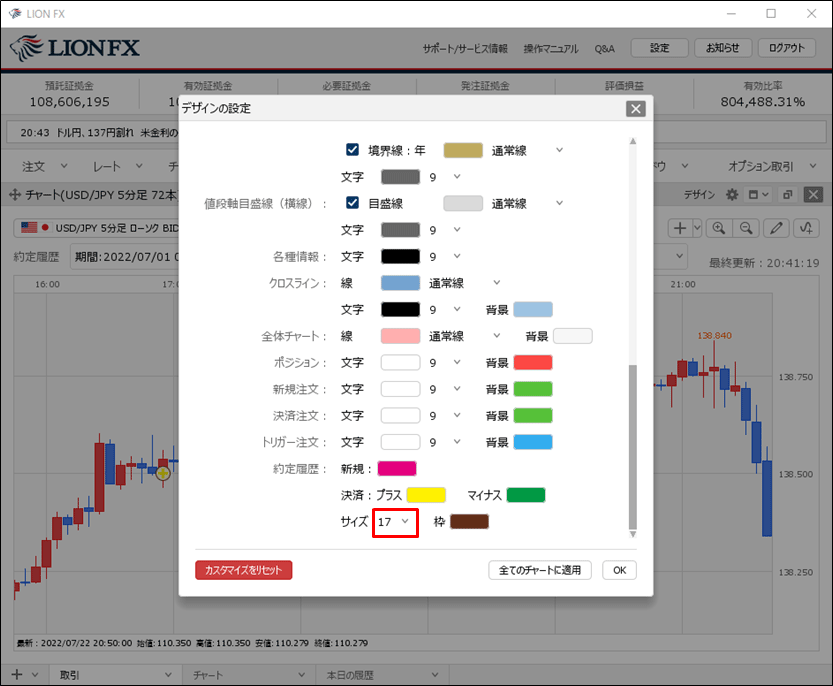
21. 約定履歴マークのサイズを変更することもできます。
【約定履歴】の「サイズ」の右側にある数字をクリックします。
【約定履歴】の「サイズ」の右側にある数字をクリックします。
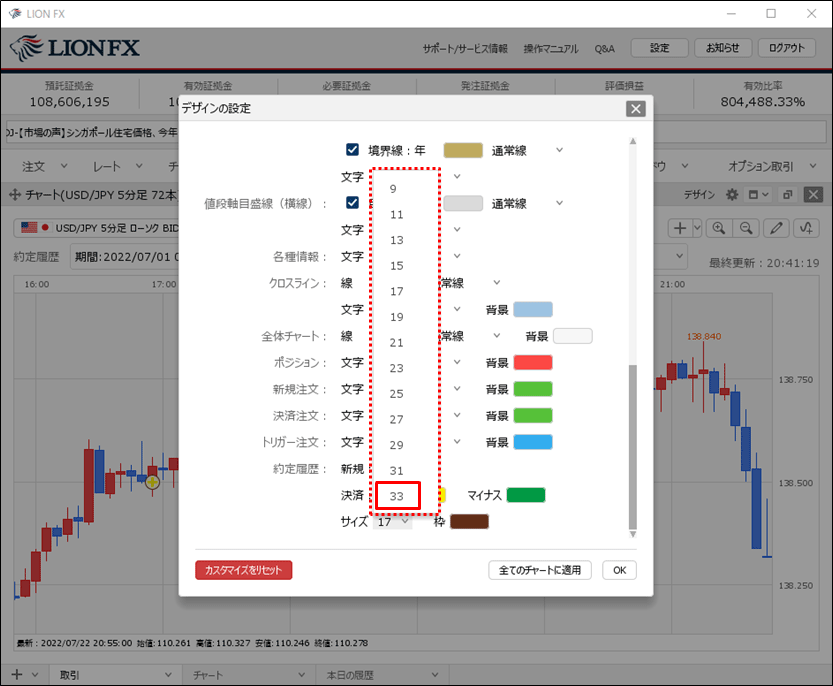
22. 文字サイズが表示されますので、表示したいサイズをクリックします。
ここでは「33」を選択します。
ここでは「33」を選択します。
23. 変更した内容を確認し、【OK】ボタンをクリックします。
※表示中の全てのチャートに同じデザイン設定を行いたい場合は、【全てのチャートに適用】ボタンをクリックします。
※表示中の全てのチャートに同じデザイン設定を行いたい場合は、【全てのチャートに適用】ボタンをクリックします。
24. 約定履歴マークの色やサイズが変更されました。